
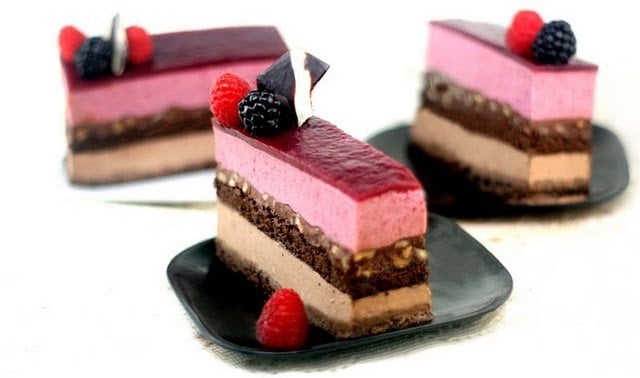
What is an Entremet? It’s a multi-layered mousse-based cake with various complementary flavors and varying textural contrasts.
Guest Post by Lisa at Parsley Sage Sweet
For those of you who aren’t familiar with entremets, the actual definition is the sweet course served after the cheese course. However, they’re mostly recognized as beautiful cakes layered with contrasting flavors and textures. I’ve pretty much been obsessed with entremets since I was 13 and saw a World Pastry Challenge on some local cable access station. Stunning, edible cakes of art, in all shapes and sizes, which when sliced open, reveal perfect layers of all kinds of goodies, from caramel to crunchy, to creamy, to ‘moussey’, to ‘cakey’ to crispy ..ad infinitum.
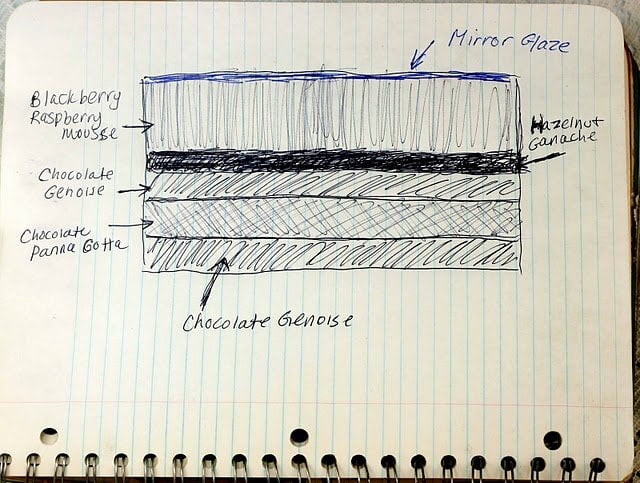
I couldn’t wait to get started, and by Saturday night, I was already sketching out the details.
Many scoff at the notion that entremets can actually be easy. Yes, there’s a lot of steps, but when taken one by one, you’d be amazed at how effortlessly it comes together. The main caveat is probably the setting time between some layers, and this is why I’m going to recommend using the freezer when building an entremet. Quicker setting, faster layering.

When I poured on the mirror, it was THE BEST mirror topping I’d ever produced. I could see my reflection clearly. It set almost immediately since the cake was frozen, a gorgeous sheet of shimmering ruby. I was thrilled to pieces, so thrilled, that I had to put it back in the freezer just to ‘make sure’ it was perfectly set and ready to slice. Cut to one-half hour later…
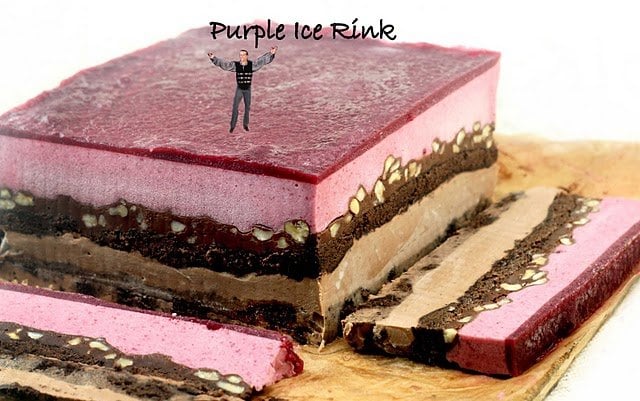
My super, duper shiny berry puree mirror is now a purple ice skating rink.
I think I see Brian Boitano landing triple salchows. I need to take photos right now – like only 20 more minutes of that perfect artificial light time, and a frozen sheet of purple ice will not do… I grabbed my blowtorch, and like a mad scientist started ‘melting’ the ice rink (Brian screams in agony). The mirror started to bubble slightly, even though I was using a light touch, so I stopped and decided to give it 15 more minutes of natural thaw in this humidity. Too late, I ruined it, it’s permanently scarred with bubbles and weird dents, and, my photo taking time was gone. Live and learn.
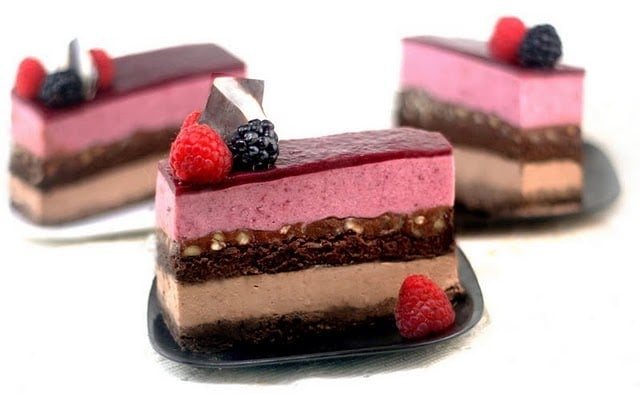
I hope you all try this. The taste and texture is amazing – rich and creamy, cakey, crunchy, light and fluffy all in one bite. The combination of blackberry, raspberry, chocolate and hazelnut, is divine.
If you enjoy delicious desserts you may also like these recipes:
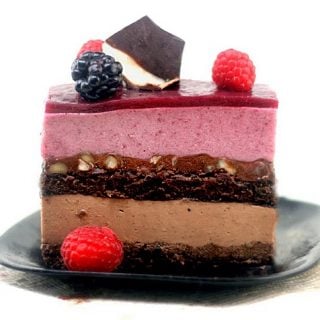
Chocolate Panna Cotta – Berry Mousse Cakes with Hazelnut Ganache
Ingredients
Chocolate Genoise
- 3 large eggs
- 3 large egg yolks
- 1 teaspoon vanilla extract
- pinch salt
- ¾ cup sugar
- ½ cup cake flour
- ¼ cup dark cocoa
Simple Syrup
- ½ cup water
- ¼ cup sugar
- 1 -2 tablespoons Chambord or Framboise* * If you’d prefer to refrain from the alcohol replace with a berry juice of some sort.
Chocolate Panna Cotta Layer (adapted from Williams-Sonoma)
- ¾ cup heavy cream
- 1 teaspoon powdered gelatin
- 1 tablespoon water
- 2 tablespoons mascarpone cheese or additional heavy cream
- 1 tablespoons sugar
- Pinch salt
- 2 ounces bittersweet or semisweet chocolate finely chopped
Toasted Hazelnut Ganache Layer
- ¾ cup hazelnuts (about 3 ounces) skinned and toasted
- ½ cup heavy cream
- 1 tablespoon unsalted butter
- 1 tablespoon granulated sugar
- 4 ounces semisweet or bittersweet chocolate chopped
Double Berry Mousse Layer
- 2 teaspoons unflavored gelatin
- 4 tablespoons cold water
- 2 tablespoons lemon juice
- 1 cup fresh blackberries
- 1 cup fresh raspberries
- ½ cup granulated sugar divided
- 1 egg white
- ¾ cup heavy cream
Instructions
FOR THE CHOCOLATE GENOISE LAYERS:
- Preheat the oven to 400F and set a rack in the middle. Lightly spray a 12×17 baking sheet with parchment paper (I spray it with a little cooking oil to stick). Butter or slightly spray the parchment liner.
- Whisk the eggs, egg yolks, vanilla, salt and sugar together in a large bowl over a pan of simmering water. Whisk gently until the mixture is just lukewarm, about 100F on a candy thermometer (or test with your finger – it should be warm to the touch). Transfer the mixture to the bowl of a stand mixer fitter with the whisk attachment (or hand held beaters) and whip on medium-high speed until the egg mixture is cooled and tripled in volume. The mixture will be thick and will form a slowly dissolving ribbon falling back onto the bowl when the whisk is lifted.
- Over a medium bowl or a piece of parchment paper, sift together the flour and cocoa. Add one-third of the flour mixture to the beaten egg mixture. Use a rubber spatula to fold in the flour mixture, making sure to scrape all the way to the bottom of the bowl to prevent the flour mixture from making lumps. Repeat with another third of the flour mixture and finally with the remainder. Pour the batter into the prepared pan and smooth the top with an offset spatula.
- Bake the Genoise for about 10 to 12 minutes. Make sure the cake does not over bake and become too dry or it will not roll properly. Let cool on a rack. Remove the cake from the baking sheet and invert it on a larger piece of parchment paper. Peel of the parchment paper that was lining the baking sheet. Set the cake aside.
FOR THE SIMPLE SYRUP:
- In a small saucepan set over medium high heat, bring all the ingredients to a simmer until the sugar dissolves, stirring occasionally. Let cool to room temperature.
FOR THE TOASTED HAZELNUT GANACHE LAYER:
- 1.Place toasted hazelnuts in plastic bag and crush with rolling pin.
- Combine cream, butter and sugar in small saucepan and bring to gentle boil over medium heat, stirring occasionally. Remove pan from heat and add chopped chocolate, swirling pan to cover chocolate with hot cream. Let stand for 3 minutes to melt chocolate. Gently whisk chocolate mixture until blended. Mix in crushed hazelnuts. Cool slightly before assembling.
FOR THE CHOCOLATE PANNA COTTA LAYER:
- Pour 2 tablespoons of the cream into a small heatproof bowl, sprinkle the gelatin over it and let stand until softened, about 10 minutes. Place the bowl in a larger bowl of hot water and stir until the gelatin has dissolved, or. nuke in the microwave for 3 -5 seconds.
- Meanwhile, in a saucepan over medium heat, bring the remaining cream, the mascarpone, sugar and salt just to a boil. Remove the pan from the heat, add the chocolate and whisk until smooth.
- Add the melted gelatin mixture to the chocolate mixture and stir until well blended. Pour through a fine strainer into a 4-cup glass measuring cup or a bowl.
- Cover the panna cotta with plastic wrap and refrigerate until slightly thickened, but not set, about 1 hour or a little less. I let mine set too long, resulting in an uneven layer of panna cotta.
- important – Make sure the first layer of genoise is frozen solid and the panna cotta is well- thickened before pouring and spreading it on, or the genoise will absorb half the panna cotta. Put it right back into the freezer once it’s spread evenly.
FOR THE DOUBLE BERRY MOUSSE LAYYER:
- First make a Swiss meringue with the egg white and 2 tablespoons of the sugar
- Set a saucepan with 1 inch of water on low heat. Place eggs white and sugar in mixer bowl and set the bowl over the saucepan as to create a double boiler. Heat the white, while whisking, until the sugar is dissolved and it feels hot to the touch, about 140F.
- Transfer the mixture to the bowl of an electric mixer fitted with a whisk attachment. Beat on, medium-high speed until the egg white is stiff, but smooth and glossy, about 8 minutes. Set aside.
- In a small bowl, sprinkle the gelatin over 1 tablespoon of the water and 1 tablespoon of the lemon juice and let stand until softened, about 5 minutes. In a blender, puree the blackberries and raspberries with the remaining 3 tablespoons of water and 1 tablespoon lemon juice.
- Strain the blackberry-raspberry puree into a small saucepan; there should be about 1 ½ cups. Add the remaining sugar and bring to a boil. Simmer the blackberry-raspberry mixture over moderate heat, stirring occasionally, until it is slightly reduced, about 5 minutes. Stir in the softened gelatin until dissolved. Let the mixture cool. Remove ¾ cup of the puree to a new bowl and stir in ¼ cup water, for the berry mirror.
- Beat the heavy cream until you have soft peaks. Fold the Swiss meringue into the cooled berry puree, then fold in the softy whipped cream.
ASSEMBLE:
- 1, Line an 8 inch square pan (preferably 2 to 3 inches deep) with parchment or plastic wrap, making sure paper or wrap extends about 3-inches up the sides over the pan.
- Cut out two 8-inch squares of Genoise. Place one square of Genoise on the bottom the lined pan. Brush with simple syrup and freeze for about a half hour.
- Remove cake from freezer, and panna cotta from the refrigerator, and pour the panna cotta on top of the frozen Genoise, smoothing it. Top with second square of genoise, and press down evenly. Brush second genoise with simple syrup, and pour the hazelnut ganache on top. Freeze for about 45 minutes to an hour.
- Make the berry mousse while ganache is setting. Remove cake from the freezer and pour berry mousse on top of ganache and freeze for another hour, until frozen set.
- Stir reserved berry puree or warm gently to loosen it. Remove cake from freezer and pour over the top of the mousse, Chill in the refrigerator until set. I prefer to freeze, then cut, to get nice slices, then bring to room temperature for serving, but since freezing kind of ruins the mirror, chilling in the fridge for the last set is fine. The cake will still be somewhat frozen when cutting, so you’ll get nice slices.
- Lift cake from pan using plastic wrap or parchment overhang. Peel down paper or wrap then square off neatly by trimming raggedy edges. Slice cake into ½ -inch to 1-inch wide rectangles, depending on how many servings you need, or how thin or thick you’d like them. Top each slice with a little cocoa, berries, and maybe some chocolate curls, disks or spirals.
Lisa
Wow..such amazing comments, I'm blushing! Thanj you, all!
Charlie – I think it would be a great idea to use the lesser (pr ;ess than that) amount of panna cotta I posted and double the amount the above recipe for berry mousse so it's as much as the one in my photos. It didn't even occur to me that there's no need to split both in half, when changing the recipe at the last second. Also..if you don't flip over chocolate, how about a vanilla panna cotta, or any other flavor you like? You could also make a vanilla genoise by substituting 1/4 cup corn starch for the 1/4 cup cocoa.
Thank you for liking my little cakes and enjoying my post 🙂
Finally, forgot to add that the genoise recipe is half of a Dorie Greenspan recipe.
Carrie @ Pure and Yummy
WOW! What an absolutely beautiful dessert! The flavors sound amazing! You made me giggle with the ice rink and torch situation, that was good stuff! Beautiful job! Thanks for sharing.
Baking Serendipity
Wow! This is seriously impressive 🙂 It looks, and I can only imagine tastes, fantastic! Chef, Happy Summer and congrats on your yearbook immortality 🙂
Peggy
This looks so elegant and beautiful! I don't think I've had the same problem with my Lowel EGO (but then again, I usually take pictures outside this time of year, and when I do use the light, it's usually the same time, so no time for comparison I suppose lol Great guest post!
Barbara Bakes
If you hadn't pointed out the flaws I would have thought it was perfection! What an amazing flavor combination.
Charlie
Hi Lisa!
What a beautiful dessert.
I'm sorry that your top and lighting didn't do as you wanted, but it sure encouraged me. Sometimes I forget that others have things that don't turn out because the pictures are so beautiful.
This is one dessert that I will try.
I think though I may do the regular size of the chocolate, and double to fruit.
Chocolate gives me horrible headaches, and I absolutely adore anything fruit.
So I think if I make it this way mostly fruit with a kiss of chocolate, it might work for me.
Congratulations on being a guest for chef (he's great),
I have saved your blog and subscribed to it.
Charlie
GourmetGetaways
OH MY GOD!!!!
WOWWY!!
That is the most delicious looking dessert I have ever seen.
I am in total awe… I have no words!
Fantastic, wish I lived a little closer, I would be knocking on your door, I have saved the recipe though and will have to give it a go, you are inspiring!
purabi naha
Lisa, beautiful presentation and amazing photography! I am your fan. This is one of the best dessert ever I have seen. shall save this recipe for my family get-together parties. Chef Dennis, I am so lucky to stop by your blog once again this time!
Elin
Lisa…thanks for sharing such a delightful , beautiful and flavorable extremet. Congrats !!! lot of work but worth it Lisa for being placed Top 9 #1 :)) Will be going over to your blog and see all your beautiful works 🙂
Chef Dennis…thanks for introducing us another wonderful food blogger to us. This is a truly a mouth watering dessert and so much love put into making it despite her leg being injured 🙂 I must learn how to make this 🙂
Liza and Chef Dennis … have a great weekend 🙂
Elin
Mary
Great guest post! I came over from Lisa's blog to see Brian skate again, but now I'm going to stick around a while and check your site out.
Kate @ Kate from Scratch
Oh my my that is gorgeous. I love the ice rink. I love challenging recipes like these.
Congratulations, Chef Dennis! Well deserved immortality, indeed. 🙂 Congratulations on another fantastic year down.
Cheryl and Adam @ pictureperfectmeals.com
We'll eat your sketch! Just reading about his cake is mouthwatering. The cake itself is indescribable… sooo good with so many wonderful flavors! Truly a work of art!
Thanks Chef again for featuring the lovely Lisa and her amazing cake. And you know that we, at least, consider you should be immortalized for all you do for the world of food bloggers, not to mention what we are sure were incredible meals you prepared for your girls. We really hope one day to be able to taste some of your food first-hand!
Tiffany
Lisa, this is stunning! Hi Chef, happy Friday and glad that you got some spring weather! 😀
Tiffany
Lisa, this is stunning! Hi Chef, happy Friday and glad that you got some spring weather! 😀
Michael Toa
Oh wow! This looks incredible! I love the sketch and the beautiful presentation. No doubt it tastes delicious too. Fantastic!